Connect the resource pool to Rillsoft Project
Goal: You know how a client’s resource pool relates to Rillsoft Project, how to select it in Rillsoft Project, and where to find it in Rillsoft Integration Server.
Duration: approx. 5 minutes
Prerequisite: At least one client has been created, see Create your first client.
As a rule, exactly one resource pool is created per client. This resource pool is used by Rillsoft Project for planning — resources, roles and teams that you maintain in Rillsoft Integration Server are available there.
Step by step: select the resource pool in Rillsoft Project
In Rillsoft Project, close all open projects.
Click File > Resource pool > Rillsoft Integration Server > Select.
In the RIS Client dialog, select the desired client and confirm with OK.
From now on, Rillsoft Project uses the resource pool of this client. The
source of the current resource pool is shown in the left corner of the
status bar of Rillsoft Project (a project should be open). A resource pool
maintained so far as a *.xml file can be imported into Integration
Server via File > Resource pool > Rillsoft Integration Server >
Import. Details in the
Rillsoft Project help: Create and Select a Resource Pool with Rillsoft
Integration Server.
Step by step: find the resource pool in RIS
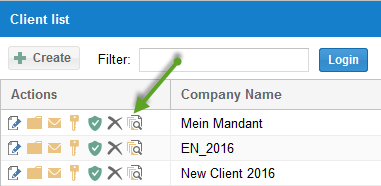
Go to Administration > Clients.
In the row of the desired client, click the resource pool icon button to list all resource pool versions of this client.
Check the result
You see the resource pool versions of the client — if needed, you can restore an earlier version.
Next steps: Manage personnel, roles and teams in the resource pool under Resource pool and teams.
connect resource pool, resource pool path, select resource pool, create new resource pool, select client, import resource pool, resource pool, personnel, employees, teams, roles, it-administration, resource-manager